When you set-up Git publishing in Azure we create backend Git repo using our OSS project Kudu. You can then use this repos’ Git URL to happily git push azure master. Needless to say this option is still available to you. In addition, today we are taking the Git deployment features to the next level by enabling direct service integrations with CodePlex and Github.
Many customers have been asking that instead of having to push to azure directly every time, wouldn’t it be nice if you and your team could simply continue pushing to CodePlex/Github and then behind the scenes Azure could wake up and take the latest commits from your central source repo and update the site. Well, I am glad to let you know that this is feasible now.
In this post I am going to focus on showing you how to take your website source code hosted in Github and hook up deployment of the sources to Windows Azure in a continuous deployment fashion. I am hoping to make this into a guided step by step walkthrough with minimal expectation of pre-requisites so hopefully you can follow along and have a great experience along the way.
If you prefer video over a walkthrough then checkout Enabling Continuous Deployment with Windows Azure Websites and Github
To start you will need following 100% FREE pre-requisites.
Required
· You need to have an account on https://Github.com/
· You need to have Git on your machine. To get Git on your machine follow the instructions here
· You need to have a Windows Azure Account. If not then get one for free here!!
Recommended
· I will use node.js during the walkthrough but this will work even if you want to use PHP or ASP.NET. You can have a clean machine and we will do the required setups along the way.
· I will be using the free web development tool - WebMatrix, which will facilitate set-up of node.js if required. If you have not already, install WebMatrix 2 from here.
· I will be using SSH based push to Github. If you want to use SSH then learn how to generate & use SSH keys for Github. Alternatively, you can ignore SSH part and use HTTPS and still follow along the walkthrough below.
· Learn about Windows Azure Web Sites via video or article.
With pre-requisites behind us let us get started.
Step 1 – Find web site sources hosted on Github which you want to deploy to Azure
I am going to use the ExpressStarter site which Justin Beckwith on our team wrote. I just made a fork to the site for demo purposes.![clip_image002[4] clip_image002[4]](http://lh3.ggpht.com/-WD-FGEZoKB8/UFj9VkUA2CI/AAAAAAAABzI/Gak7ZQ-u-lg/clip_image0024_thumb.jpg?imgmax=800)
Notice the highlighted “Fork” button, click it and you will get your own copy of the ExpressStarter template. Once you fork it you will get both SSH and HTTP end points to your git repo. My URL looks like below
HTTPS: https://Github.com/VishalRJoshi/ExpressStarter.git
SSH: git@Github.com:VishalRJoshi/ExpressStarter.git
I will be using these repo urls in the follow up steps:
Step 2 – Clone the Github repo locally on your machine
Open command prompt on your machine and navigate to a folder in which you would like to create the site. In my case I have navigated to C:\demos\GithubHooks. Now just type the commandgit clone URL
Since I am using SSH my command is going look like below:
![clip_image004[4] clip_image004[4]](http://lh6.ggpht.com/-DSgFN54d944/UFj9XMLlc7I/AAAAAAAABzY/a6qQvGNLz7Q/clip_image0044_thumb.jpg?imgmax=800)
Once the clone is complete the command prompt should look like:
![clip_image005[4] clip_image005[4]](http://lh5.ggpht.com/-9Q23lbIVM-A/UFj9X0lJtII/AAAAAAAABzo/R6ZV2CNpRs4/clip_image0054_thumb.png?imgmax=800)
Step 3 – Make a quick change locally and push to Github
I am going to use WebMatrix for making the change especially because it supports bunch of node.js features. You can get WebMatrix 2 for free from http://webmatrix.com Note: WebMatrix is not supported on Mac so if you are on Mac please use any other text editor that you would like and skip the WebMatrix steps:Once you open WebMatrix it should look like below:
![clip_image006[4] clip_image006[4]](http://lh4.ggpht.com/-eAolpoEsvNc/UFj9YuqNuBI/AAAAAAAABz4/0MFVqsujAtY/clip_image0064_thumb.png?imgmax=800)
Click “Open Site” à “Folder as Site” and navigate to the folder “ExpressStarter” under the directory where you ran the git clone command:
![clip_image008[4] clip_image008[4]](http://lh3.ggpht.com/-1CluP-9CpgU/UFj9ZWQZVBI/AAAAAAAAB0I/_Gn4X9RWCTg/clip_image0084_thumb.jpg?imgmax=800)
Hitting “Select Folder” will trigger WebMatrix to identify your site to be node.js site as below:
![clip_image010[4] clip_image010[4]](http://lh4.ggpht.com/-CSgJX6dYR0A/UFj9aQhCOqI/AAAAAAAAB0Y/G2eoSb3ReXg/clip_image0104_thumb.jpg?imgmax=800)
Hit “Continue” and you will be presented with a EULA screen like below.
![clip_image012[4] clip_image012[4]](http://lh3.ggpht.com/-Dw0LLs3Mr7Y/UFj9bgCEF6I/AAAAAAAAB0o/JIuFcoIFvmw/clip_image0124_thumb.jpg?imgmax=800)
Accept the EULA and at this point if you do not have node.js/npm/iisnode installed on your machine WebMatrix is going to install it for you. You should see a progress screen like below:
![clip_image014[4] clip_image014[4]](http://lh5.ggpht.com/-YdTayViSVr8/UFj9chCyqFI/AAAAAAAAB04/lMHYiQdQuSQ/clip_image0144_thumb.jpg?imgmax=800)
And once all the installation is complete you should be able to run you site locally by hitting the “Run” button in the WebMatrix ribbon.
![clip_image015[4] clip_image015[4]](http://lh3.ggpht.com/-lQbJp_cGXIo/UFj9dSrJEcI/AAAAAAAAB1I/Z8erEukyq2o/clip_image0154_thumb.png?imgmax=800)
If for any reason you see your browser saying something like below, please email me at vishal.joshi@microsoft.com or send a tweet @vishalrjoshi.
![clip_image017[4] clip_image017[4]](http://lh5.ggpht.com/-ddpBLX6az_k/UFj9eqVWcLI/AAAAAAAAB1Y/HV7HnKxOy1A/clip_image0174_thumb.jpg?imgmax=800)
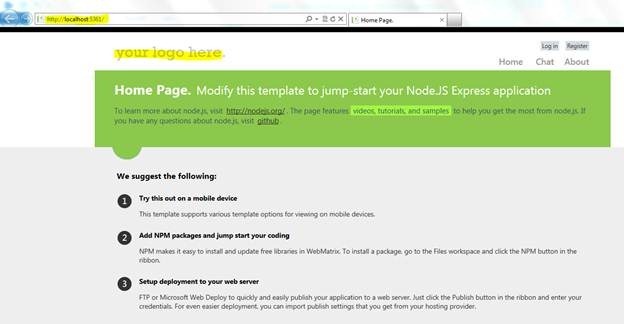
Ideally, you will not get the screen above and your running site should look as below:

Now, Let us now make a quick change. Click on the “Files” workspace at the left bottom corner of WebMatrix
![clip_image020[4] clip_image020[4]](http://lh4.ggpht.com/-MbCX4pytF6U/UFj9h7xMrUI/AAAAAAAAB14/cqz-0DKe4b0/clip_image0204_thumb.png?imgmax=800)
Now expand the treeview to layout.jade and make the quick change from “Your logo here” to something like “My Awesome Github Site”
![clip_image021[4] clip_image021[4]](http://lh6.ggpht.com/-QMiaTMhYA88/UFj9i_vGQbI/AAAAAAAAB2I/ciwJtcdLta4/clip_image0214_thumb.png?imgmax=800)
You can hit the run button and see the change locally on the new node.js site if you like. With that, we are ready to push this change back to Github. Let us go back to the command prompt
First change the directory to “ExpressStarter” as you will be one level above as shown below:
![clip_image022[4] clip_image022[4]](http://lh3.ggpht.com/-J6PHY0oFpFM/UFj9jac9gCI/AAAAAAAAB2Y/abZaVHlcp8I/clip_image0224_thumb.png?imgmax=800)
Next type the command git status. This will tell you what all files have been modified by you locally. Your git status command should show only one file changed
![clip_image023[4] clip_image023[4]](http://lh4.ggpht.com/-cFxaW27np30/UFj9uaPW8EI/AAAAAAAAB2o/HBhjdS2Kc4w/clip_image0234_thumb.png?imgmax=800)
Now we want to commit this change to our local git repository. To do this we will type type the command git commit –am “My Awesome Github Site”

Now that our change is committed locally we are going to push the change up to Github. To do that we simply have to type git push origin master
Since I am using SSH keys I will not be asked for any password, but if you are using HTTPS then you might have to type your Github password at this point. Nevertheless the result should be as below:

If we now go and check the Commit history on my repo in Github it should show something like:
![clip_image027[4] clip_image027[4]](http://lh5.ggpht.com/-Ba0vhJwoS0k/UFj9wpSic9I/AAAAAAAAB3Y/PVTzvhXv3VI/clip_image0274_thumb.jpg?imgmax=800)
At this point you have a working local site with a local git repo. You have also remote central git repo in Github. You are also able to make changes locally and push them to Github. You can also authorize other developers in your team to this Github repository and they too can push their local changes to Github.
Our next goal here is to keep your workflow with Github exactly the same but in the process of pushing to Github we also want to be able to have the site up and running in Windows Azure. Do note so far we did not have Windows Azure in picture at all but now let’s set that up next.
Step 4 – Create a new site in Windows Azure
By now I assume you already have a free Azure account created, if not, create one here!! Once you have the account click on “Portal” button near top right of http://windowsazure.comNow click on “+” icon on the bottom left of your Portal and you should get the below screen.
Select Compute à Web Site à Quick Create and name your site something unique. You can choose the region and subscription of your choice. If you are using the free trial subscription than that is what will be selected by default.
![clip_image029[4] clip_image029[4]](http://lh5.ggpht.com/-z0s_YzOKr9E/UFj9xBhQpaI/AAAAAAAAB3o/chiW0I9Cpu8/clip_image0294_thumb.jpg?imgmax=800)
Now hit “Create Web Site” and wait for a few seconds. Your site should get running soon.
![clip_image031[4] clip_image031[4]](http://lh5.ggpht.com/-IL7ryL6Pxas/UFj9xoXSSgI/AAAAAAAAB34/4-9iLCVrrGc/clip_image0314_thumb.jpg?imgmax=800)
Step 5 – Enable Git Publishing for the new site
Next step is to enable “Git Publishing” for your new Azure site. To do that click on the site above to visit the dashboard and click “Setup Git Publishing”![clip_image033[4] clip_image033[4]](http://lh4.ggpht.com/-zyOEN3WjLTQ/UFj9yp21wAI/AAAAAAAAB4I/tZ6wAhnmRxU/clip_image0334_thumb.jpg?imgmax=800)
This should show you some progress message and then land you on the below screen:
![clip_image035[4] clip_image035[4]](http://lh3.ggpht.com/-7Yns8a3_zOg/UFj9z_pvRTI/AAAAAAAAB4Y/MtkOnCDwQwM/clip_image0354_thumb.jpg?imgmax=800)
Open the flap which says “Deploy from my Github project” which should have the link “Authorize Windows Azure” as shown below:
![clip_image037[4] clip_image037[4]](http://lh5.ggpht.com/-t3_0XDrCxjw/UFj90uHKBaI/AAAAAAAAB4o/g9JsuwPi3SE/clip_image0374_thumb.jpg?imgmax=800)
Clicking the “Authorize Windows Azure” to your Github repository will launch a wizard which will set up service hook in Github. Let us follow the Wizard.
Step 6 – Follow the Wizard for hooking up your Github repo with your Azure site
First the Wizard will launch Github UI for you to log into. Just log-in with your Github credentials![clip_image039[4] clip_image039[4]](http://lh5.ggpht.com/-zF05TYbZPts/UFj91Tn_MbI/AAAAAAAAB44/dJOGlXYfFYE/clip_image0394_thumb.jpg?imgmax=800)
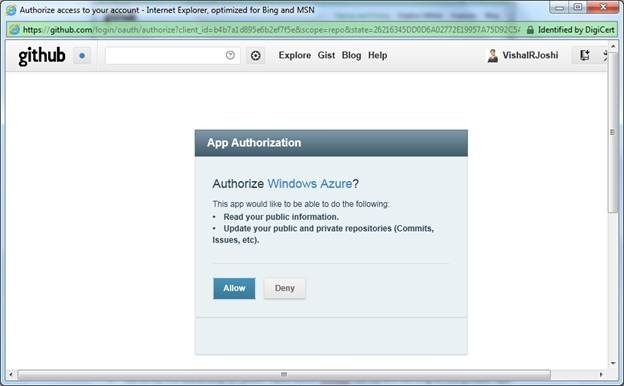
On successful sign-in it will ask you to Authorize Windows Azure on Github like below:

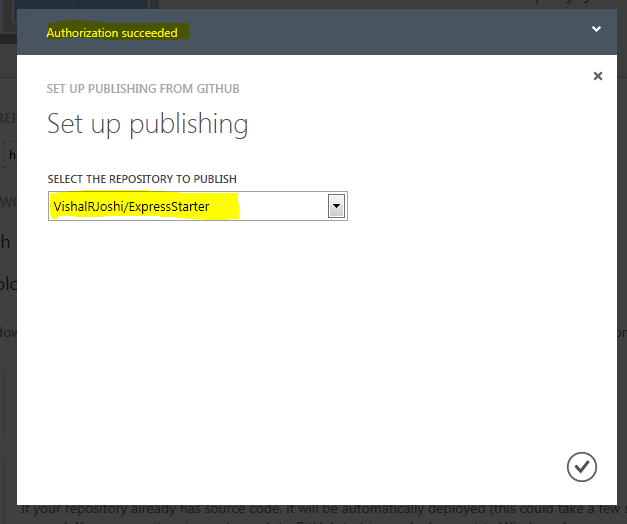
Click “Allow”. Doing so will take you to the below screen stating “Authorization succeeded” and listing all the repos that you have access to in your Github account.

Select the ExpressStarter project that we have been checking into in Step 3 and click the “check” button. Within few seconds your Azure portal screen should show “Deployment progress” as below:
![clip_image044[4] clip_image044[4]](http://lh4.ggpht.com/-3eTzHZMrKt0/UFj-tGOPQ-I/AAAAAAAAB50/0YvTd7oRo_I/clip_image0444_thumb.jpg?imgmax=800)
This is a moment to pause again and think what just happened. What Windows Azure did was to use the authorization that you gave via oAuth wizard to access Github API to first list your projects for you. Once you picked your project then it went and setup a service hook.
If you are really curious got to Github to your repository and click “Admin” as shown below
![clip_image046[4] clip_image046[4]](http://lh3.ggpht.com/-Dl3CZxAYqJY/UFj-uB6CkoI/AAAAAAAAB6E/KIPlbtf3YBs/clip_image0464_thumb.jpg?imgmax=800)
Then on the admin page you will see Service Hooks and Webhook Urls (1).
![clip_image048[4] clip_image048[4]](http://lh6.ggpht.com/-1N920_9QMo4/UFj-v2O6_MI/AAAAAAAAB6U/Ki2ZgD1oXj4/clip_image0484_thumb.jpg?imgmax=800)
That URL is essentially the URL to your Azure Kudu Service which will be called by Github when there will be a push done on your Git repo within Github. As soon as Kudu Service receives a call from your Github account it wakes and pulls the latest commits from Github repo into the Azure repo. Currently we support only public repos to pull from but we are working on a solution to pull even from private Github repos over next few weeks.
Once Azure repo gets a commit the usual flow of Azure deployment triggers which includes fetching npm packages in case of node, doing build in case of ASP.NET etc. And you see the deployment progress that you see above.
Sometimes it might take time for the deployment progress to show, considering you now know what all happens behind the scene, please be patient, it will show up soon.
Step 7 – Check out your first auto deployment
Soon the deployment will be complete and you can see your first active deployment as shown below:![clip_image050[4] clip_image050[4]](http://lh6.ggpht.com/-pERHh0xfxwM/UFj-2jz3VVI/AAAAAAAAB6k/S4rP7pT4pko/clip_image0504_thumb.jpg?imgmax=800)
At the bottom of your Azure portal you will always see a black bar, which we call as command bar. It should have a browse button as shown below:
Click the “Browse” button and see your site launch live on Azure.
![clip_image054[4] clip_image054[4]](http://lh3.ggpht.com/-wG0MHuG59so/UFj-5VfdAPI/AAAAAAAAB7E/WlDeGErlTMs/clip_image0544_thumb.jpg?imgmax=800)
Hopefully you are happy as I am J well now let us go and make one more change to our local site.
Step 8 – Make another change locally and push back to Github
Go to WebMatrix and in the same layout.jade file make one more change. I am this time saying “My Awesome Azure Site” and hit “Save”![clip_image056[5] clip_image056[5]](http://lh5.ggpht.com/-jS9C0ZyNz7A/UFj-9QB3oTI/AAAAAAAAB7U/kgMtWlPa5v4/clip_image0565_thumb.jpg?imgmax=800)
Rest of the deal is same as Step 3 above so I will avoid the repeat screenshots for most but the steps in command prompt essentially are:
git status
git commit –am “My Awesome Azure Site”
Now that the change it done it is time to see push the change to Github.
Step 9 – Check out your change go live on Azure
Just to see the awesome UI integration, I recommend you have your Azure portal side by side to your command window as you hit enter on the next command:git push origin master
![clip_image058[5] clip_image058[5]](http://lh4.ggpht.com/-pVgurI0vZxY/UFj-9zssF2I/AAAAAAAAB7k/-HYxpNi3a8g/clip_image0585_thumb.jpg?imgmax=800)
As soon as the git push completes you will see the Azure portal “Deployments” tab wake up and very soon you will have your second deployment
![clip_image060[4] clip_image060[4]](http://lh6.ggpht.com/-fOOiF2Qa5sc/UFj--5EuXfI/AAAAAAAAB70/iRWf8wyDcQQ/clip_image0604_thumb.jpg?imgmax=800)
Now browse the site and notice that your second change has gone live as below:
![clip_image062[4] clip_image062[4]](http://lh3.ggpht.com/-XvV8Cm8mOqM/UFj-_SmNhtI/AAAAAAAAB8A/XIk8oPO6w4g/clip_image0624_thumb.jpg?imgmax=800)
Step 10 – Rollback to the first change with ease
For most part we are done but it is worth doing one last fun thing. Select the previous deployment and notice that in the command bar below you will have a “Redeploy” button as shown below:![clip_image064[4] clip_image064[4]](http://lh4.ggpht.com/-Smalb3kcGJQ/UFj_AeYqm9I/AAAAAAAAB8U/DBKBqMe4GG8/clip_image0644_thumb.jpg?imgmax=800)
Click that and you will be asked for a confirmation like:
![clip_image066[4] clip_image066[4]](http://lh6.ggpht.com/-GAYBzYaExaA/UFj_A5Da76I/AAAAAAAAB8k/B3yuMZqjqfY/clip_image0664_thumb.jpg?imgmax=800)
Click “Yes” see the re-deploy kick in and notice that your “Active Deployment” changes within seconds
![clip_image068[4] clip_image068[4]](http://lh4.ggpht.com/-Ofdq1yPD5UM/UFj_CfyaORI/AAAAAAAAB80/gvnnG6uXzAI/clip_image0684_thumb.jpg?imgmax=800)
On browsing the site you will see that you are back to previous deployment

Conclusion
This is how easy it is to setup continuous deployments from Github to to Windows Azure. Almost the same type of workflow also works for CodePlex. If you have any questions of thoughts please do feel free to comment here or send me an email at vishal.joshi@microsoft.com. I will also continue posting updates on twitter @vishalrjoshi, hope you can join the conversation there too.//code awesomely
Vishal

