Thursday, December 02, 2010

Web Server Startup Vs. Starting a project for debugging

We recently had an interesting thread within our Web Platform & Tools team on a blog comment which I thought I would share verbatim so that it would resolve similar confusion that might exist in the community… :

To gain more context please read the following tiny blog post otherwise it is quite likely that you will not follow anything discussed on the email thread here J

Tips & Tricks: Startup Options & Instances of ASP.NET Development Server  in a Multi-project solution.

The below email thread is to shed light on behind the scene activities that happen within MSFT on many comments that are posted on many blogs. It is demonstrate that many of the responses on my blog are only feasible due to team effort across the board… J.

The thread is displayed in FIFO model (unlike standard outlook view) to help easy blog readability…

From: Anonymous [mailto:noreply-comment@blogger.com]
Sent: Monday, October 25, 2010 2:54 PM
To: Vishal Joshi
Subject: [Vishal Joshi's Tangent] New comment on Tips & Tricks: Start-Up Options and Instances of A....

Anonymous has left a new comment on your post "Tips & Tricks: Start-Up Options and Instances of A...":
I really wish this default were "false". I have never had a case where I want all 10 web projects in our solution to start at once ... and every time I have to do a new checkout I have to go turn all of these settings off. Sadly, VS2010 did not fix this ... we are still saddled with this unfortunate behavior.

From: Vishal Joshi
Sent: Monday, October 25, 2010 2:55 PM
To: ASP.NET Web Projects Team

Subject: FW: [Vishal Joshi's Tangent] New comment on Tips & Tricks: Start-Up Options and Instances of A....

Fyi…

Vishal R. Joshi | http://vishalrjoshi.com | @vishalrjoshi

From: MSFT Web Guy 1

Sent: Monday, October 25, 2010 3:14 PM
To: Vishal Joshi; ASP.NET Web Projects Team
Subject: RE: [Vishal Joshi's Tangent] New comment on Tips & Tricks: Start-Up Options and Instances of A....

I don’t think that we are using those settings. For instance I just created a solution with 2 WAP, when I F5 both startup, which I think is good because many times people have a services that are consumed by other projects, and that UI is little known.

The issue that I’m seeing here is that if I explicitly go in and configure the startup projects in the UI the settings are not used. I would say this is a bug.

Thanks,

From: MSFT Web Guy 2
Sent: Monday, October 25, 2010 3:51 PM
To: MSFT Web Guy 1; Vishal Joshi; ASP.NET Web Projects Team
Subject: RE: [Vishal Joshi's Tangent] New comment on Tips & Tricks: Start-Up Options and Instances of A....

Huh?

From: MSFT Web Guy 1
Sent: Monday, October 25, 2010 4:46 PM
To: MSFT Web Guy 2; Vishal Joshi; ASP.NET Web Projects Team
Subject: RE: [Vishal Joshi's Tangent] New comment on Tips & Tricks: Start-Up Options and Instances of A....

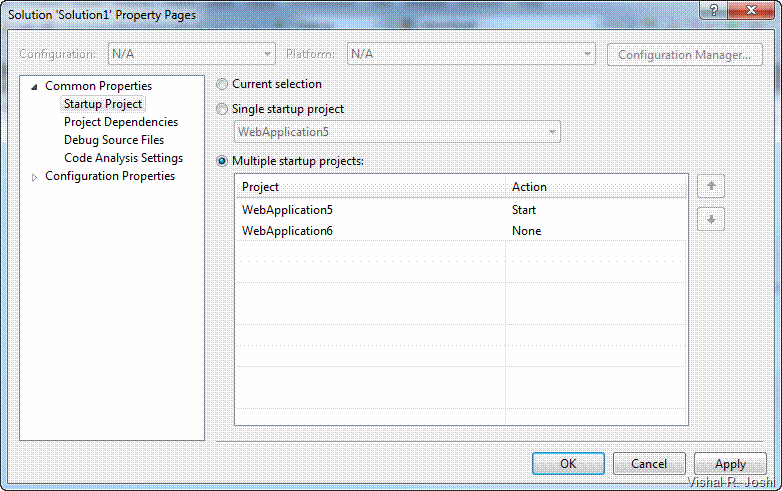
The settings in this dialog are not respected, both WAPs are started.

clip_image001

From: MSFT Web Guy 2
Sent: Wednesday, October 27, 2010 8:27 AM
To: Vishal Joshi; ASP.NET Web Projects Team
Subject: RE: [Vishal Joshi's Tangent] New comment on Tips & Tricks: Start-Up Options and Instances of A....

No. This is by design. This dialog indicates which projects are going to be debugged. The web property in WAP governs whether to start the web server on F5 for projects which are NOT being debugged, is independent of the settings on this dialog. So with this configuration, WebApplication5 will attach a debugger to cassini, WebApplication6 will start its cassini but a debugger will not be attached to it.

The customer is complaining that the web property should be initialized to false so that only the startup project will launch its web server.

From: MSFT Web Guy 1
Sent: Wednesday, October 27, 2010 9:22 AM
To: MSFT Web Guy 2; Vishal Joshi; ASP.NET Web Projects Team
Subject: RE: [Vishal Joshi's Tangent] New comment on Tips & Tricks: Start-Up Options and Instances of A....

So can you explain the meanings of the three settings for action:

· None

· Start

· Start without debugging

clip_image002[4]

From: MSFT Web Guy 2
Sent: Wednesday, October 27, 2010 9:29 AM
To: MSFT Web Guy 1; Vishal Joshi; ASP.NET Web Projects Team
Subject: RE: [Vishal Joshi's Tangent] New comment on Tips & Tricks: Start-Up Options and Instances of A....

When user presses F5 do:

None  - don’t start this project

Start – debug this project

Start w/o debugging – do the equivalent of Ctrl-F5 for this project

Note that start w/o debugging is NOT equivalent to the web project flag of starting the web server. Do a ctrl-F5 and you will see why…

From: Vishal Joshi
Sent: Wednesday, October 27, 2010 10:24 AM
To: MSFT Web Guy 2; MSFT Web Guy 1; ASP.NET Web Projects Team
Subject: RE: [Vishal Joshi's Tangent] New comment on Tips & Tricks: Start-Up Options and Instances of A....

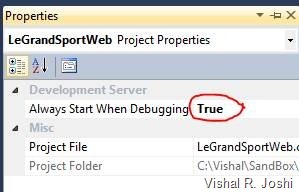
I see thanks for the clarification…  Based on the discussion it seems the customer is expecting the below property

clip_image003

to be false for all projects but Startup project… Would you agree?

Vishal R. Joshi | http://vishalrjoshi.com | @vishalrjoshi

From: MSFT Web Guy 2
Sent: Wednesday, October 27, 2010 10:30 AM
To: Vishal Joshi; MSFT Web Guy 1; ASP.NET Web Projects Team
Subject: RE: [Vishal Joshi's Tangent] New comment on Tips & Tricks: Start-Up Options and Instances of A....

That is what he is asking for, but I don’t necessarily agree. Assuming a typical solution only has a couple of webs in it, it probably makes sense that all the web servers are started on Debug\Ctrl-F5. Sounds like your blog post is misleading.

From: MSFT Web Guy 2
Sent: Wednesday, October 27, 2010 10:46 AM
To: Vishal Joshi; MSFT Web Guy 1; ASP.NET Web Projects Team
Subject: RE: [Vishal Joshi's Tangent] New comment on Tips & Tricks: Start-Up Options and Instances of A....

As a side note, you can multi-select all the waps (or web sites) in the solution, and change the property for all them in one go:

clip_image004[4]

---------------------------


END OF THREAD…:-)

Hope this was useful

-Vishal

Friday, November 05, 2010

Team Build + Web Deployment + Web Deploy + VS 2010 = Goodness

I have to confess this is one of the most requested blog post in Web Deployment via either direct emails, comments on the blogs, twitter, in conferences etc and it has been completely my bad to have prolonged this as long as I have. As it is said - better late than never, so without any delay let us get started.

In this blog post I am hoping to cover the topics of setting up your web deployment using Web Deploy (MsDeploy) and Team Build. When we talk about automated web deployment with Web Deploy (I love our naming J) there are multiple aspects that come into mind, let us clear few of the concepts before we proceed with the walkthrough:

· Web Packaging – Web Packaging is the process of creating a .zip file which can contain your web content (pages, images, CSS, JavaScript files etc), databases, IIS Settings, Application creation, ACLs etc. From your Team Build you can easily create Web Packages which you can ask your server admin or Test team to pick up and install on you web servers for testing. With Web Packages (.zip files) you will also get a .cmd file created by VS 2010 which can be run to install the package. There is not a direct automation to run this command file from team build but you can easily hook up post build step to execute the .cmd file if you would like to automate the installation of the package as well.

· Web Publishing – Web Publishing is the process of directly taking the source application (in Team Build case the sources are hopefully in your TFS source repository) and directly pushing it to the destination web server. In this case a .zip file is not created but if you would like that for archival then that is possible as well. If you want your web servers to have your latest web application installed in Continuous Integration (CI) fashion then Web Publishing is the direction I would recommend.

Note - Web Publishing can only work when you have your Web Servers configured to accept Web Deploy request. There is an earlier blog post about Setting up your Web Servers for Web Deploy, without having your Web Servers setup the below walkthrough (Publish Section) will not succeed so please make sure that you have your Web Servers configured correctly before proceeding.

Step 1: Get your TFS Build Server and Source Code Control Set up

I am going to assume that you have a license for VS 2010 TFS environment setup. Below are the simple steps to have TFS setup using basic configuration (i.e. everything installed as shown belowJ)
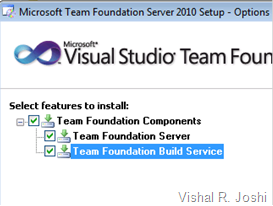
clip_image002

Once the product has installed and you get a successful “Setup is complete” dialog, finish the installation and you will see a TFS configuration wizard. First let us configure Team Foundation Application Server and then configure the Team Build service as shown below:
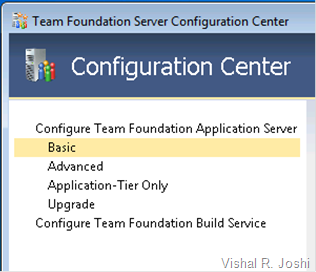
clip_image004

The TFS Basic install is sufficient as it is the simplest setup option and honestly it does most of the stuff that I need. Honestly in my opinion it is so many times better than TFS 2008 which was much more complicated to set up. For nearly all of the screens just simply keep clicking next and eventually the set up wizard will finish and hopefully you will agree with me that this setup is indeed a breeze.

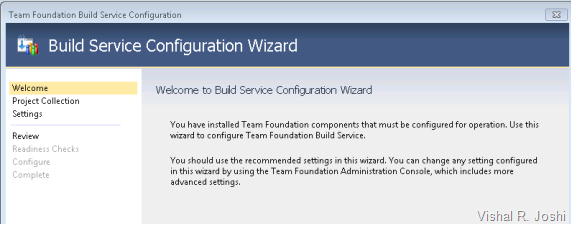
Once the server configuration is complete, start the wizard for to Configure Team Foundation Build Service and it will come up with a Welcome Screen below:
clip_image006

Again, click Next for each page and accept the defaults, before even you know you will have a functional TFS server ready to go. I know that the above explanation will sound like a joke but really TFS 2010 setup is as simple as that and it is difficult to complicate it unless you really require all the bells and whistles. I did have a loaded Microsoft software box but if you don’t then there might be some minor pre-requisites required but I am sure the setup wizard will let you know that J

Glitch: Now there is one glitch in this entire set up still which I need to call out for you. When you build your web projects, you need the Team Build service to have all the .targets files your projects needs. The TFS installation I showed above does not include all the targets files that comes with Visual Studio 2010. To get the necessary files on your machines, install Visual Studio on the same machine as your TFS server so your projects can build successfully. Now that certainly does not sound very nice so the alternate back door option is to go to %Program Files (x86)%\MSBuild\Microsoft\VisualStudio\v10.0 on your Visual Studio IDE box and copy the target files on your Team Build Server at the similar path. For Web deployment you will most likely only need “Web” and “WebApplications” folder but there is nothing wrong with having all the tasks and targets there just in case you need them later.

Step 2: Connecting to your TFS server from Visual Studio and getting your project into source control

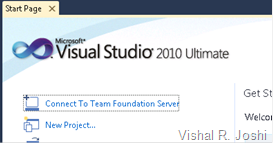
On the home screen of VS 2010 you now have an option to Connect to Team Foundation Server or alternatively you can do so from the “Team” menu within VS too as shown below:
clip_image008

clip_image010

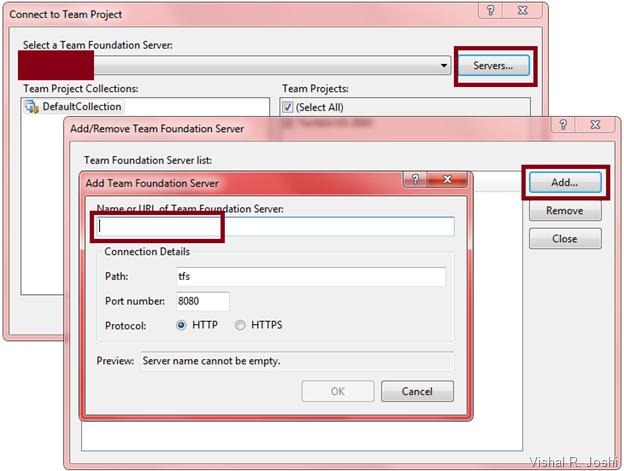
You will then see the “Connect to Team Project” dialog where you point to your TFS Server. If your server isn’t already populated in the server list drop down, you can add it clicking the “Servers…” button:
clip_image012

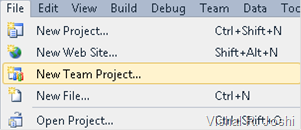
Once you are connected, you need to create a new Team Project from the File menu:
clip_image014

Give your team project a name and click through the wizard to create your Team Project and finish the wizard. Once your team project is created, you are ready to get your app into the source code control.

If you need further help in setting up your source code control and build server then check out the links below:

· TFS 2010 Installation Guide

· Using Version Control with TFS 2010

· Understanding basic Build with TFS 2010

Step 3: Get your app running and checked into TFS Source Code Control

Well you know how to get your app up and running so I will not dive into that J but just for reference of this walkthrough below the is app I am using. I created this Web App for TechEd US 2010 in New Orleans using MVC Music store sample on CodePlex. (You can watch the TechEd US 2010 video here) As you can see in the sample below it is working on my localhost.
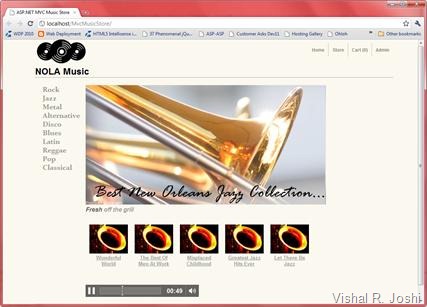
clip_image016

The site is also checked into my TFS source code control as shown below:
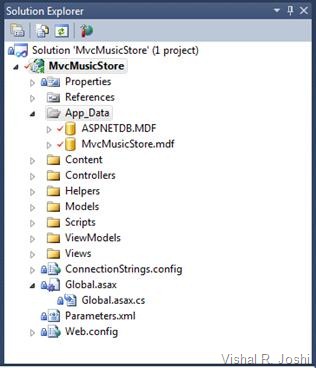
clip_image018

To check your application to Source Code Control you simply need to right click it and the menu options will guide you from there.

Step 4: Connect to TFS using Team Explorer

On VS 2010 Team Explorer you will find a button on the top right which will allow you to connect to a team project. When you click the button and select your Team project your Team should similar to what I have below:
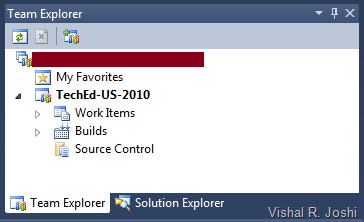
clip_image019

Step 5: Create a new Build Definition

A build definition instructs TFS on how to trigger the build. In this case we want deployment to accompany the Build too so we will create a new Build Definition and configure it accordingly. For that right click on the “Builds” node of the Team Project and click “New Build Definition”

At this point you will see the below dialog where you can name your build definition appropriately.
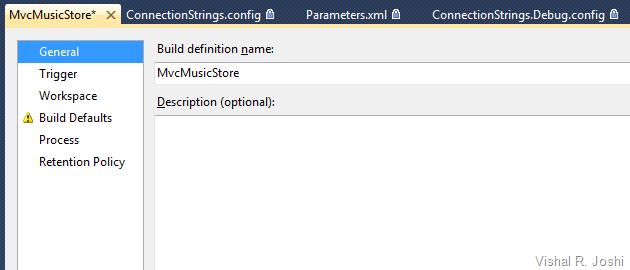
clip_image020

Step 6: Configure your Trigger in TFS 2010 Build Definition

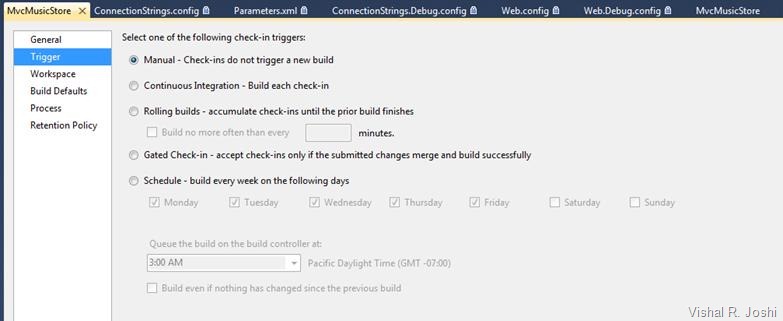
Trigger configuration informs Team Build on when to fire a build there are several options as shown below and I will explain them at high level for you to be able to make the right call
clip_image022

· Manual – As the name suggests this mode allows the Build to be triggered manually as you desire, for demo purposes I am going to use this but ideally you want to explore other options also to determine what works best for you.

· Continuous Integration – This is classic celebrated CI model where every check in into the source code control will cause a build and hence resultant deployment that we would configure.

· Rolling Builds - Sometimes when working in massive teams CI can be disruptive as there are several check ins happening every other hour. In that case you can inform your dev team that there will be a build happening every X minutes and they should plan for that. During end game period of the project this configuration may help to have routine quick builds coming out.

· Gated Check-Ins - This was one of the highly requested features for teams who did not want any broken builds due to bad check-ins. This will ensure that only check-ins which merge & build successfully.

· Scheduled Builds – As name suggests you can also have builds coming out during regular times every day. This is the model which is used by larger VS and .NET teams in general, we too get our builds created on a nightly basis. The funny part is that I do not think that VS & .NET build configuration is as easy as TFS 2010 makes it for everyone else J

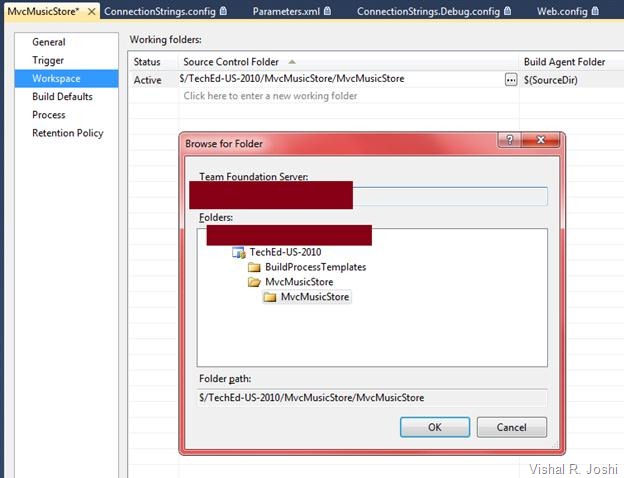
Step 7: Configure your Workspace which needs to be built

This is where you specify what you want to build. As shown below I have configured my Project folder as the build target.
clip_image024

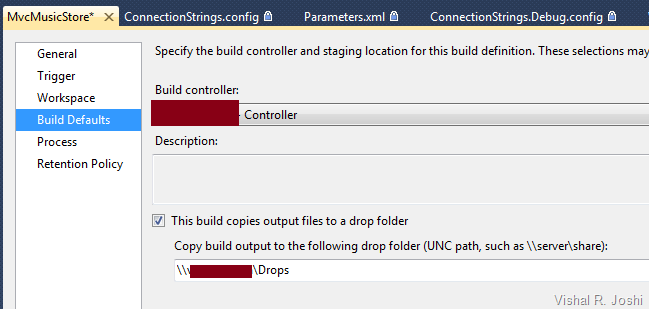
Step 8: Provide Drop Location where you want your builds to be dropped

This is relatively a simple step for creating a UNC folder with correct folder permissions so that your TFS build (which typically runs under NETWORK SERVICE) has correct permissions to write to build output path. My setting looks as below:
clip_image025

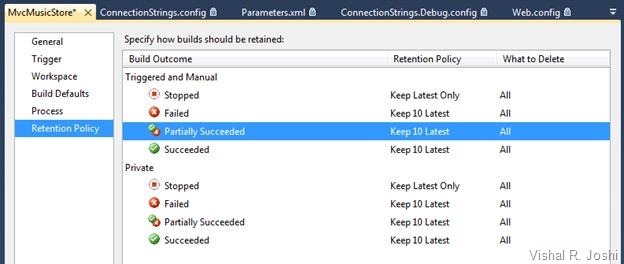
Step 9: Setup the Retention Policy

Retention Policy simply informs how to save the builds in the drop folder mentioned above. I did not modify mine so it looks as below, although you might want to change these settings based on the disk space that you available:
clip_image027

Step 10: Configuring the Deployment Process

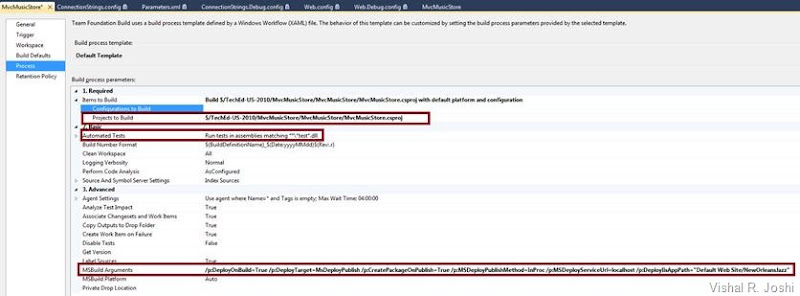
For this you have to go to the “Process” tab which looks as below:
clip_image029

Most of the items in these are self explanatory but I want to spend some time explaining a few which matter in our case:

· Automated Tests – TFS allows you to run the tests in Tests.dll automatically during each build so if you would like to have some unit tests run during build and deployment then this is a great place to mention that. There is also a flag to stop running the tests in the grid which you can set if you do not want to disturb your configuration of this property.

· MSBuild Arguments - This is the location where you need to specific the hooks to mention that you want to trigger deployment as part of the build.

o Web Packaging – For Web Packaging the argument you want to specify is simply:

/p:DeployOnBuild=True;

The above property is going to tell the Web Publishing Pipeline (WPP) to engage after the build is successful. At the default target which executes is Packaging you should not need to provide any other properties.

o Web Publishing – For Web Publishing the arguments you want to specify are:

/p:DeployOnBuild=True /p:DeployTarget=MsDeployPublish /p:CreatePackageOnPublish=True /p:MSDeployPublishMethod=InProc /p:MSDeployServiceUrl=localhost /p:DeployIisAppPath="Default Web Site/NewOrleansJazz" /p:UserName=domain\user /p:Password=myPassword

In this case because we want publishing with Web Deploy to happen we provide /p:DeployTarget value to be MsDeployPublish.

/p:CreatePackageOnPublish allows you to create a package before publishing, it will help you keep an archive of what you published on your local drops folder. Although do note that It will certainly slow down the deployment and eat your disk space so choose it as you see fit.

/p:MsDeployServiceUrl tells the WPP where the project needs to be published to. In the beginning of this post I had mentioned that you need to set up the remote Web Server for Publish, this is the place where it finally gets used. The URL format is typically https://ServerName:8172/MsDeploy.axd. As I am using localhost as my build as well as test server I do not need to provide the full URL (i.e. VS 2010 will complete it as needed) but since your test server is going to be different than build server in real world you will have to provide full URL.

[UPDATE: It was brought to my attention that I had missed a detail in this post which is certainly worth clarifying.  If you are using the Service URL by setting up the server as explained above then you will have to change MSDeployPublishMethod from InProc to WMSVC so the property should become /p:MSDeployPublishMethod=InProc  to /p:MSDeployPublishMethod=WMSVC  Note that if you are publishing to localhost VS can use Web Deploy APIs directly within the same process of VS hence I was using InProc as my option.  If you are publishing to a different server then InProc will not work and give you errors so please make the above change.  Apologies for missing this detail earlier.]

/p:DeployIisAppPath tells the publishing system the IIS Site Name/App Name that you want to publish to. E.g. Default Web Site/MVCMusicStore

/p:UserName=domain\user is the actual User Name which has access to the remote Web Server on which you set up the Web Deploy Publishing

/p:Password=myPassword is the actual Password for the User Name above

NOTE: Do note that the sample here can only publish to IIS 7 (Win2k8 and above), if you are running IIS6 or lower (i.e. Win2k3/ Win2k) then you need to follow slightly different process. Please drop a comment here and I will write a follow up post on that.

o File Copying – This will allow you to simply to a xCopy deployment without needing to setup any remote service

/p:DeployOnBuild=true /p:DeployTarget=PipelinePreDeployCopyAllFilesToOneFolder /p:_PackageTempRootDir=\\BuildServer\BuildDrops\MVCMusicStore /p:AutoParameterizationWebConfigConnectionStrings=false

/p:_PackageTempRootDir allows you to specify the remote server location on which you want xCopy to happen. Again the remote location will need permission to be writable by Team Build Agent which is running the deployment

/p:AutoParameterizationWebConfigConnectionStrings=false essentially tells WPP to not parameterize the Web.Config file since doing so will introduce replicable tokens within Web.Config which are used during Packaging & Publishing.

NOTE: File Copying was honestly never designed out of the box to be used from Team Build in such fashion but some people have been interested in using Web.Config Transformation during xCopy and hence I thought it was worthwhile mentioning this in the blog.

PS: Using properties which begin with underscore “_” is not typically recommended as they are considered private MSBuild variables by convention but in this case it is relatively easy way to accomplish the xCopy solution. Even in future versions of VS if this property changes I am hopeful there will be alternate/easier way to do this. In general if you can set up the Publishing on your web server using Web Deploy I think it will yield you longer term advantages and I think it is a worthwhile endeavor to take.

· Projects To Build - When you have only one web application and class libraries then it is easier to just have the Project (CSProj or VBProj) to build as shown in my example above, but if you have bunch of projects which all need to built then you might have to go with Solution Build option (.SLN).

Deployment for Web Apps is feasible at both Solution as well as Project build level although when it comes to Solution Build then you might want to make sure that the properties you are passing at Solution level will apply to all the projects in the solution which might not always the outcome you desire. In that situation all these properties can be set within the .csproj or .vbproj files too. You can do that by unloading your project file and in the top <PropertyGroup> section just add above properties as you like:

For e.g /p:DeployOnBuild=True can be added as <DeployOnBuild>True</DeployOnBuild>

Step 11: Trigger your Build Definition

Now that you have everything configured you can right click on the Build Definition and hit “Queue New Build”.. That will show you a dialog which you can simply hit OK on and you should soon get your Build ready and the site deployed as shown in my case below:

clip_image031

After a while when you check into the Completed section of the build you should see your new build lined up.

clip_image033

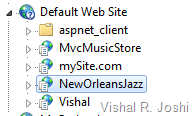
On inspecting the IIS and SQL Server you can see my sites & DBs are also deployed.
clip_image034 clip_image035

Finally on running the application it runs great too:
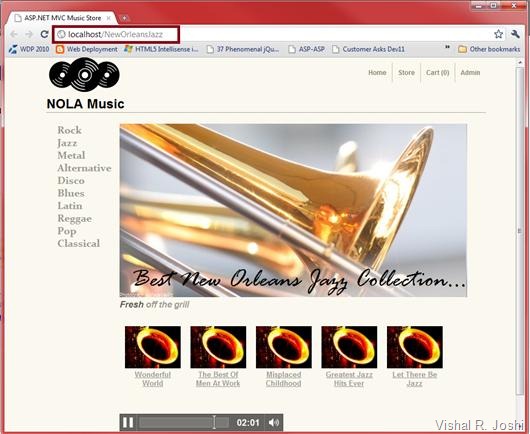
clip_image037

This was actually a combination of setting up my DB deployment settings too, to learn more about configuring your deployment in the right way check out TOC on Web deployment.

PS: If you get an error on TFS like below:

TF215097: An error occurred while initializing a build for build definition \TechEd-US-2010\MvcMusicStore: There was no endpoint listening at http://MyServer:9191/Build/v3.0/Services/Controller/1 that could accept the message. This is often caused by an incorrect address or SOAP action. See InnerException, if present, for more details.

Then most likely you do not have your Build Service running, you can enable it by going to Start à All Programs à Team Foundation Administration Console à Build Configuration.

Conclusion

Hopefully this will get you going with your automated web deployments. Please write back if you feel anything is missing or if you have any other questions. If you have questions like how would you configure what gets deployed, how to set up DB deployment, how to change web.config etc etc we have tons of articles on how to customize your deployment. You can look at a whole list of them at Overview of Web Deployment

Hope this helps

Vishal
Tuesday, October 26, 2010

Setting up my new Web Development Machine

For more immediate and tiny updates on web development and photography follow me on Twitter @VishalRJoshi

I just recently got a new laptop, it looks awesome, is blazing fast and from now on I will spend at least few hours every evening with it.  I have always wanted to upgrade but Microsoft keeps getting me powerful work laptops I hardly ever came out of the spell.  But recently stars aligned and that provoked me to get a personal laptop:

1. I hate the looks of Lenovo W500 which is what I have at work

2. I have software licenses for photography and other software which feel weird to register from work machine

3. The screen resolution on Lenovo’s is not as good as I would like

4. Work laptop makes me work more and play less, I really do need a clean separation J

Well anyways I got my laptop this weekend. As I would primarily use this for Web Development and Photography I thought I would write down a post which would be a nice walk down the memory lane for me in the future and perhaps help someone now.

Hardware

Intel Core i5 ~ 2.5GHz, 4GB RAM, 500GB with 7200 RPM HD and 1680 x 1050 high quality screen.

I was hoping to get i7 processor but most reviews and friends said that it heats up on a laptop and does not provide as much value. I was also going to go with 8GB RAM but a friend of mine got his 8GB RAM cheaper online than with the laptop. Finally I was going to buy SSD Hard Disk but could not justify the cost to myself in the mirror.

OS & Office

Windows 7 Ultimate x64 (Paid)

I think Win 7 Professional would do just fine as I am not intending to use bit locker or 35 languages which seems to be the only difference between Professional and Ultimate. Anyways, I think I am spoilt, it just feels good when Windows starts and the screen says Ultimate J

Office Professional 2010 (Paid)

Again Office Home & Business would do just fine but I had got a copy of Office Pro 2010 which was waiting for my new laptop to arrive J

Outlook

I configured Outlook with my Live.com, Gmail.com and Hotmal.com email ids. The Hotmail connector for Outlook actually comes down automatically during the configuration and the thing sets up like a charm.

Web Development (Free)

As any other developer I am inclined to download a bunch of stuff just in case I need it but this time I have decided to keep the list of installed software to bare essentials and going with the minimalistic attitude. Also in support of high productivity I got Web PI from Microsoft.com/Web and customized as following:

Tools (Free)

clip_image002[18]

Framework (Free)

clip_image004[4]

Database (Free)

clip_image006[4]

Server (Free)

clip_image008[4]

Apart from the above listed I also took IIS6 Metabase compatibility for Visual Studio à IIS interactions (yeah I know we need to remove the dependency on it J), some basic logging features, IIS Management Console, Remote Management for my hosted sites, Windows & Basic Authentication.

I was inclined to enable a bunch of modules but I thought I will enable them when I need them and try to stay as bare minimum as possible.

Honestly, after I kicked off Web PI, there was one restart for .NET 4 framework install and everything went super smooth. Unfortunately my SQL Server Express installation failed and I had to go and install it manually from MSDN.

In anycase, I do not mind installing SQL Server 2008 R2 Express manually as it allows me to configure mixed mode authentication and provide sa password, which I sometimes like to use with my connectionStrings.

I do not exactly remember but I do think that the SQL Server 2008 Management studio also required a restart of the machine but other than that it did go pretty smooth.

Honestly, getting a fully functional Web Development box was never that easy before Web PI so I am really happy that our team was able to pull together this highly impactful product and the more I see it in use on day to day basis within Microsoft, it makes me feel even better about the impact it can have. Most certainly there are pros and cons but overall I think it is a good thing J

Visual Studio Themes (Free)

First thing is to get VS customized to get a darker and a nicer theme. I like Selenitic by Tim Thomas but you can find several others at http://studiostyl.es/ to suit your needs.

If you are using VWD Express 2010 which I use on my machine then to set the Theme you have to go to following location on Tools à Options (make sure you set the settings file by using the “Use team settings file” check box.

clip_image010[4]

Typically I would go to the “Extensions Manager” in “Tools” menu and get few power tools but since VWD Express does not have all extensibility hooks not many of the power tools are really available.

NuPack (Free)

Next I was super inclined to get NuPack from Codeplex as I know the packages in there are growing like crazy but I prevented myself from going there just yet as there were bunch of other things to get in place and again, using the policy of getting something only if I need it.

7Zip (Free)

Several times during conversation at work 7Zip comes up as the possible direction we want to take to save download times across many of Microsoft technologies. In general I think it is an innovative community project which is worth your attention. It also has easy file extensions associations in Tools à Options within 7 Zip File Manager and you can download it from http://www.7-zip.org/

Reflector (Free)

They say it for a reason that every .NET developer should have reflector, you can get that for free at http://reflector.red-gate.com/download.aspx. Unfortunately, if you are using any Express versions of Visual Studio like VWD Express 2010 then you won’t be able to use the Reflector Add In for debugging but even without that Reflector is pretty useful in itself.

Resharper (Free)

Again there is a reason why they make banners “Can’t Code without Resharper” but oh well I am using VWD Express and the Add-Ins are not allowed with it so unfortunately no Resharper for me. Btw you can download it from http://www.jetbrains.com/resharper/download/ for Free if you are working on an OSS project or for $199 if you are getting it for personal use.

FireFox & Firebug (Free)

I am eagerly looking forward to use these and I am sure most people do as well.

Windows Live Writer (Free)

Well this blog would not have happened as easily as it has without Live Writer. If you plan to write you have to try this software for sure. Download it from Windows Live Essentials download center.

TweetDeck (Free)

Next was to get into the Social community and install TweetDeck and connect all of my Linked In, Facebook, Four Square as well Twitter accounts on it. This will provide some reasonable entertainment for me.

EverNote (Free)

I use Evernote all the time to sync up all types of my work items, To Dos from home, shopping list etc etc and it keeps it all synced up.  This is one of the best tools ever if you have not used it yet.  Get it from http://www.evernote.com/

LightRoom (Paid)

Finally, it comes down to having a great machine and a great photo management tool. My cousin just got me a copy of Light room and I got it all installed and ready on the machine. You can get Lightroom 3 for 30 day trial for Free if you have never used it from Adobe site.

With all that said even with keeping stuff simple and minimal I landed up installing quite a bit of software on my machine. Interesting piece is that other than the Hardware, OS, Office & Lightroom everything else on my machine is Free software. I intend not to add a lot more to my machine but if I do I will most likely update this post too. In the meantime I hope you find this at least minimally useful/interesting.

-Vishal

Wednesday, September 22, 2010

Web Deploy: IIS6 to IIS7 Migrations + Link Extensions

Recently I was having a conversation with one of Web Deploy (MSDeploy) users and an interesting scenario came up.  He essentially wanted to move his site from IIS 6.0 to IIS 7 and wanted to consider Web Deploy to do this.  In addition he actually was fine with just xCopy-ing the site’s content from IIS6 server to IIS7 server as it was almost 6GB+ in size and trying to create a zip package for it was not most the optimal way of using resources, nevertheless creating a zip package using Web Deploy for just the IIS configuration is what was certainly desirable due to ease of portability & use.

I thought this would be a good opportunity to write a quick note to share with you that migration from IIS 6 to IIS 7 was one of the original scenarios of Web Deploy and so if you are considering the migration from IIS 5.1 to IIS 7 & above then for sure you should consider Web Deploy to help you with it.

Now as you know IIS 6 configuration is based on Metabase and IIS 7 configuration is based on new XML based configuration system so even trying to migrate just the configuration part might be challenging to do manually.  Web Deploy does a fantastic job with this configuration migration and more.

In IIS 7 there is a great UI for you to use to export a Web Site, Web Site or Web Application package from IIS Manager but in IIS 6 there was no way to introduce any UI without servicing IIS 6 which when you consider the impact worldwide is not most ideal thing to do. But anyways the long and short of it is that you will have to use msdeploy.exe command line in IIS 5.1/IIS6 to create a package. When you get the package on to IIS 7+ box then you can of course use the “Import Application” UI on the IIS7 Action pane (right column) even if the package was generated by IIS 5.1 or 6…

One other interesting area to know about is Web Deploy Link Extensions coz they will come very handy when you go about migrating your IIS 6 sites & servers to IIS 7.  Earlier I have talked about how Web Deploy works and what Web Deploy providers are. In addition to Web Deploy providers it is useful to understand the concept of Link Extensions. Well as the name suggests a “Link Extension” is some artifact which Web Deploy can decipher from a parent provider based on some kind of meta data or link which might be present in the parent. Some of the notable link extensions are:

· AppPoolExtension - Application Pool configuration which resides outside the contained site configuration, but again the site configuration points to which Application Pool it uses.

· CertifacteExtension - Certificates which are external artifacts associated to the site but something which site’s IIS configuration links to.

· ContentExtension - Site’s content which resides on the disk but again technically only a pointer to it exists in the site’s IIS configuration.

· FrameworkConfigExtension - The root web.config associated with each .NET Framework (stored C:\Windows\Microsoft.NET\Framework\v4.0.30319\Config) which some IT Admins customize and IIS configuration knows which ASP.NET version you are using so technically that can be deciphered too.

The meta point is that these are all the above link extensions can be turned on or off from Web Deploy command line when you are trying to migrate your IIS 5.1/IIS6 sites and servers to IIS 7 and above… There are more link extensions and it is likely that more might be added in the future, you can keep a link to this TechNet article as that is where we might update the information if it changes.

Finally for the scenario that we started talking about in the beginning of this blog the command line to create a package of all of IIS 6 configuration for a Site (with Site id 1) without including the content of the site would be:

MsDeploy.exe -verb:sync -source:metakey=lm/w3svc/1 -disableLink:Content -dest:package=c:\mySite1Package.zip

If you would like to sync up the entire server then the command line would be:

Msdeploy.exe -verb:sync -source:webserver60 -dest:package=c:\mySite1Package.zip -disableLink:Content

Now the generated MsDeploy package can be easily transported to IIS 7 or IIS 7.5 and configuration can be easily replicated without the content being touched in anyway.

Hope this helps,

Vishal

Saturday, July 03, 2010

Web Deploy Parameterization in Action

A few weeks back I explained the key differences between Web.Config Transformation and Web Deploy (aka MSDeploy) Parameterization…  Before you read this post I recommend that you read Transformation vs. Parameterization post, it is tiny and will clear few fundamentals…

Automatic Parameterization

Before I dive in more let me clarify that if you are using VS 2010 then in common scenarios you may not even need to do custom parameterization, coz VS 2010 already parameterizes things like IIS Application Name, Application physical installation directory and connectionStrings… So when you actually create a web deploy .zip package you can easily build it once and deploy it several number of times by changing the parameters values…

Custom Parameterization

The typical scenarios where you will need to do custom parameterization is for scenarios like:

  • You have an appSetting  which needs to be changed by server admin at install time…
  • You are using a WCF Service and you want to change the end point at install time…
  • You have created re-usable web package for community apps and have bunch of questions to ask the users before they install the app (similar to all of the apps that you find in Application Gallery eg ScrewturnWiki, DNN, etc…)

Scenario

In today’s post I am going to use Parameterization with VS 2010 for changing an appSetting & WCF Service end point… Before we do that let us look at the web.config settings which we want to change at install time…

App Settings  - The Log Folder location here (“value” attribute) is something which I want my admin to be able to change at production install time to a shared location so that if my app is virtualized and put on a web farm then I have a common place to go and look at the log…

appSettings

WCF Endpoint Below is my WCF EndPoint URL (“address” attribute) which I would like my admin to change to the servers/sites on which the WCF Services will get deployed…

WCF endpoint

Install Time Experience

Installation of Web Packages can be done in couple of different ways:

We want to make sure that no matter which direction our IT Admin takes he/she gets an opportunity to provide values for the above two parameters…

Parameters.xml File format

As I explained in the earlier post Parameters.xml file can be passed to Web Deploy when your .zip Web package is being created and that allows Web Deploy to determine what items in your web should it mark as “changeable” at install time…  VS 2010 makes your life easier by allowing you to simply drop the Parameters file in the root of your web project and if a file with the name Parameters.xml is found in the root of your project it passes it to Web Deploy which then parameterizes your web…

The Parameters.xml file follows a specific format, the key attributes to note for each parameter that you declare within parameters.xml file are:

name  Required unique name to identify the parameter with e.g. “Service 1 endpoint address”

description – This text shows up in the UI of IIS Manager to help the user fill in the value so anything clarifying the parameter is cool…

defaultValue - Optionally you can specify a default value for a parameter so that while installing the package a user may know what kind of values are permissible…

scope – Regular Expression to determine what entities (files e.g. web.config, DBs, Web Deploy providers etc) does the parameter apply to

kind – There are several kinds of parameters but the key ones to remember are:

  • XmlFile – Use this for web.config, any settings XML files etc where you can make replacements using XPath
  • TextFile – Use this for non-XML file where you can make replacements by looking for fixed text or token within a file. e.g. you can put @@replaceme@@ in the a settings.ini file and during installation that text can be replaced

match -  This depends upon the parameter kind… For e.g. for XmlFile parameter the match expression would be a XPath… For TextFile the match expression could be @@replaceme@@ which you might pre-place in the file…

Declaring Parameters using Parameters.xml

Below is the content of Parameters.xml file that I dropped to the root of my MVC Application

<?xml version="1.0" encoding="utf-8" ?>
<
parameters
>

<
parameter name="Log Folder Location" description="Please provide a shared location where the app can write log files to" defaultValue="\\Logs\MvcApp\Logs\" tags=""
>
<
parameterEntry kind="XmlFile" scope="\\web.config$" match="/configuration/appSettings/add[@key='LogFolder']/@value"
/>
</
parameter
>

<
parameter name="WCF Service1 Endpoint Address" description="Please provide the Endpoint address for Service1 that this MVC App needs to call" defaultValue="http://localhost:61938/Service1.svc" tags=""
>
<
parameterEntry kind="XmlFile" scope="\\web.config$" match="//system.serviceModel/client/endpoint/@address"
/>
</
parameter
>

</
parameters
>


If you notice each of the Parameter above you can see that I am using XmlFile parameter kind with Xpath as the match syntax…  After adding this Parameters.xml file into my project my solution explorer looks as below:


parameters.xml


Now I can simply right click on my MvcApplication and hit “Build Deployment Package”…  The resultant .zip file should be created at obj\Debug\Package\MvcApplication1.zip…


Validating that Parameters really worked


  • Now to validate whether the parameters really worked you can very quickly open IIS Manager (Start –> Run –> InetMgr) and select your Default Web Site


  • You can now click the “Import Application” command on the right side bar and pass the newly created .zip package to it.


IIS Manager Import Application


  • On Hitting  next on the Import Application wizard you will be able to see the “Parameterization” screen which user will be able to pass values to the parameters.  Notice even our defaultValues provided in the Parameters.xml show up:


Parameters Import Application


  • I am now changing the value of these variables as shown below:


image


  • When I now go ahead and finish the wizard by clicking “Next” and go ahead and inspect the Web.Config file in the deployed location, I can see that the changed parameter values were applied to the web.config file seamlessly…


Parameterized Web.config


  • Also do note that in the process above “Parameters.xml” will also get deployed with your web application, in reality you do not need that file… To avoid that file from getting deployed you can go to its properties (select the file and hit F4) and set “Build Action” = None as shown below:


Build Action None


There is a ton more power of parameters.xml file that you can explore via Technet Article on Web Deploy Parameters or IIS.NET Articles about Parameters.xml but for scenario like ours the above information should hopefully suffice…


Thanks for reading :-)


-Vishal

Friday, June 18, 2010

Parameterization vs. Web.Config Transformation

I was recently asked about being able to change values of different variables like ConnectionStrings, Installation physical directory, app Settings etc during install time rather than build time, so I thought it might be worth while to de-mystify the concepts around Web.Config Transforms and Parameterization…

Web.Config Transformation

Geeks say Web.Config Transformation is a great feature of Web Deploy (aka MsDeploy), well the first part about being a great feature is true :-) but it is important to note that Web.Config Transformation is not a Web Deploy feature but it instead is a VS 2010 only feature.  Web.Config Transformation is connected with Build configuration of MSBuild/VS/Team Build etc…  Its XML transformation engine is wrapped in MSBuild and has a UI around in VS 2010 which yeilds following benefits:

If you are building a deployment web package (.zip) and know which environment you are building for then web.config transformation is great.  This is the category where many of us fall coz we build for a release environment and need the right config file to go in that deployment package.  For that matter many people are just fine creating web packages for the correct environment they are deploying to…

Now for others who want to be able to build just once and deploy to both test as well as staging/release environment then an embedded web.config file for one environment may not work.  For this scenario there is parameterization.

Parameterization

Parameterization, unlike Web.Config Transform is Web Deploy (aka MsDeploy) only feature, which means that it will not work in non-Web projects or when you are using other protocols like FTP/FTPS etc.  Parameterization from Web Deploy standpoint is a 2 step process

  1. Declare Parameters: You create a Parameters.xml file and pass it to Web Deploy while creating the package…  In this file you need to indicate what file you want to parameterize  (e.g. web.config), what variable inside the file needs to be parameterized (e.g. connectionString) and what would be the default value of the variable (e.g. release connectionString)… Using Parameters.xml file, Web Deploy will create an internal meta data file within your .zip package which guides Web Deploy to know what “Questions” to ask the person who is installing the .zip package… 
  2. Set Parameters: When user is about to install the web package the value of the Parameters can be provided to Web Deploy via several means.  In case you are using IIS Manager to install the package then the IIS Manager UI will automatically show the Parameters with filled in default values.  If you are using Web Deploy command line to install the package then you can provide a setParameters.xml file to the commandline (in case of VS 2010 generated deploy.cmd file just having setParameters.xml file in same folder as the .cmd and .zip file is sufficient).  The setParameters.xml file is a very simple name-value pair file in which you can provide the value of the parameter adjacent to its name.

In one of the future posts I will write more about how to use Parameterization for some canonical deployment scenarios, but hopefully this will lay the foundation of how to differentiate between build time transforms from install time parameters.

Conclusion

If you can know your environment settings during build time use Web.Config transformation. 

If you would want to create deployment package only once and then enter the settings during install time then use Parameters.xml

VS 2010 actually uses a combination of Parameters and Web.Config transforms to provide you with a seamless experience (i.e. connectionStrings, IIS Application Name etc are already parameterized by default) so for most common scenarios you would hopefully not have to delve into understanding all the details but if you have any questions then of course feel free to ask here or via email…

Thanks

Vishal

Sunday, May 23, 2010

throw new System.DumbDevException(“Vishal”);

Funny enough but I am here to confess that I did not realize that I had set “Comments Auto-Approve” to off on my blog since I don’t know when…  And as I use Windows Live Writer to write my blogs I never care to go to the blog dashboard for nearly anything…

Anyways, for whatever reason I thought I will go and check if I was missing out on some new features of blogger so I logged in and realized that I had several hundreds of comments piling up waiting for moderation…

So first of all sorry for the dumbness and secondly I ask you to be patient while I weed through all the comments that are accumulated so far…

I am hoping that over this next week or two I will be able to get through them all but if you need anything urgently then do not hesitate to drop me a line at Vishal.Joshi@Microsoft.com

Thanks - Vishal

Tuesday, May 18, 2010

Applying XDT magic to App.Config

For several weeks now people have been asking to be able to use the XML Document Transform (XDT) with App.Config files similar to what is available with Web.Config files in VS 2010…
In all honesty there is no official/supported  implementation of XDT for any other project type than Web Application Projects but the good news is that the basis of Web.Config Transformation resides in Web Publishing Pipeline (WPP) which are set of extensible tasks and targets hooked up to provide a great deployment story for Web Applications…
Today, Ming (our senior dev on Visual Studio) and I decided to get together to give some love to App.Config file too… The below implementation is a crude way of getting XDT working into other project types within VS 2010… In a way, I would say it is a big solution for a smaller problem but the idea here is to get people unblocked and show the kind of things that WPP is capable of doing… 
If by now everything is sounding foreign then please check out the articles:

  • Web.Config Transformation
  • VS 2010 Snippets for Web.Config Transformations
  • Web.Config Transforms (XDTs) for any XML files in your web projects
    Goals
    • Being able to use XDT syntax for App.Config files similar to what you can use with Web.Debug.Config and Web.Release.Config…
    • Being able to use this in an automated fashion in build environments like Team Build…
    • Reduce the concept count and make it as simple as possible (without digging deep into optimization & performance)…
  • Please take a look at Visual Studio extension which allows you to do this without the manual workarounds below:
  •  http://visualstudiogallery.msdn.microsoft.com/69023d00-a4f9-4a34-a6cd-7e854ba318b5

    Step by Step Instructions

    The example I am using below should be hopefully super simple that you can follow along without any prep work… All you need is VS 2010 which has “Visual Web Developer” components installed…

    Step 1 Create a new Windows Forms Application in VS 2010

    Step 2 Add App.Config file to the project…

    Add simple test settings to App.Config file as shown below:

    <?xml version="1.0" encoding="utf-8" ?>
    <configuration>
      <appSettings>
        <add key="author" value="Vishal Joshi"/>    
      </appSettings>
    </configuration>


    Step 3 Add App.Debug.Config file to the project, I would recommend using the same App.Config file adding mechanism as shown below


    app.debug.config


    Step 4 Modify the content of App.Debug.Config as shown below:


    <?xml version="1.0"?>
    
    <!-- For more information on using App.config transformation visit http://go.microsoft.com/fwlink/?LinkId=125889 -->
    
    <configuration xmlns:xdt="http://schemas.microsoft.com/XML-Document-Transform">
      <appSettings>
        <add key="article" value="XDT Magic for App.Config Files" xdt:Transform="Insert"/>
      </appSettings>
    </configuration>


    The key things to note above are:


    • There is a XDT namespace declaration which allows XDT engine to recognize the Transform/Locator syntax in the file


    • There is a new node being inserted into the config file using the syntax xdt:Transform=”Insert”


    Step 5 Save the edited files and unload the project frin VS 2010 Solution Explorer using the right click command as shown below:


    unload project


    Step 6 Edit the .csproj/.vbproj file to make App.Debug.Config file to be dependent on App.Config file as shown in the syntax below:


        <Content Include="App.config" />
        <Content Include="App.Debug.Config" >
          <DependentUpon>App.Config</DependentUpon>
        </Content>


    The key things to note above are:


    • By default the build action of App.Config and App.Debug.Config file will be “ None”… It needs to be changed to “Content”… This is a tiny pre-requisite for WPP but if you encounter any issues because of this then we can dig the work around…


    • DependentUpon node will make your App.Debug.Config appear as a node under your App.Config file similar to the way Web.Debug.Config and Web.Release.Config files appear under Web.Config file…


    • In VB Projects nested files are hidden so you might need to unhide these by clicking the icon on the solution explorer…


    Step 7 Change the ProjectConfigFileName property within your .csproj/.vbproj file


    WPP has an inbuilt property called ProjectConfigFileName which is by default set to Web.Config, we need to change this to app.Config which will allow projects like WinForm project not expect web.config files to transform… You can add this property right under ProjectGuid property as shown below:


      <PropertyGroup>
        <Configuration Condition=" '$(Configuration)' == '' ">Debug</Configuration>
        <Platform Condition=" '$(Platform)' == '' ">x86</Platform>
        <ProductVersion>8.0.30703</ProductVersion>
        <SchemaVersion>2.0</SchemaVersion>
        <ProjectGuid>{2D587604-866B-4675-8587-FA9728EC59D8}</ProjectGuid>
        <ProjectConfigFileName>App.Config</ProjectConfigFileName>


    Step 8 Hook up WPP within your WinForms project by importing the WPP targets.


    You can search for “Import” node in your project file and then simply copy below one line for WPP targets import


      <Import Project="$(MSBuildExtensionsPath)\Microsoft\VisualStudio\v10.0\Web\Microsoft.Web.Publishing.targets" />


    Step 9 Add a target to copy the transformed App.Config file to your output (BIN) directory


    You can simply copy paste the below code just before your </project> node closes in the .csproj/.vbproj file


      <Target Name="PostTransformAppConfig" AfterTargets="TransformWebConfig">
        <Copy Condition="Exists('$(TransformWebConfigIntermediateLocation)\transformed\App.config')" 
              SourceFiles="$(TransformWebConfigIntermediateLocation)\transformed\App.config" 
              DestinationFiles="$(OutputPath)\WinFormConfigTransform.exe.config" />
        <Copy Condition="Exists('$(TransformWebConfigIntermediateLocation)\transformed\App.config')" 
              SourceFiles="$(TransformWebConfigIntermediateLocation)\transformed\App.config" 
              DestinationFiles="$(OutputPath)\WinFormConfigTransform.vshost.exe.config" />
      </Target>


    The key things to note above are:


    • We hooked up the new PostTransformAppConfig target after TransformWebConfig target… The TransformWebConfig target is the native target in WPP which does any XML transform and will do the actual job of transforming App.Config as well..


    • The location at which the new App.Config file is getting copied is pretty self explanatory but do note that you do want to change “WinFormConfigTransform” to be the name of your own Project…  I just used a project called “WinFormConfigTransform” and hence the DestinationFiles path is named as such…


    Step 10 Run /T:TransformWebConfig task on your Project from MSBuild


    You need to use Visual Studio 2010 Command prompt and type in the below command


    msbuild C:\Vishal\WinFormConfigTransform.csproj /t:TransformWebConfig


    After running the above command if you now check the BIN folder of your project you should see that the Project.exe.Config file is now modified as shown below:


    image 


    NOTE: If you want the App.Config file to be Transformed after every build in your Visual Studio IDE (this will take some perf away but may not even be noticeable) then you can change Step 9 code to be as below:


    <Target Name="PostTransformAppConfig" AfterTargets="Build">
        <CallTarget Targets="TransformWebConfig"/>
        <Copy Condition="Exists('$(TransformWebConfigIntermediateLocation)\transformed\App.config')" 
              SourceFiles="$(TransformWebConfigIntermediateLocation)\transformed\App.config" 
              DestinationFiles="$(OutputPath)\WinFormConfigTransform.exe.config" />
        <Copy Condition="Exists('$(TransformWebConfigIntermediateLocation)\transformed\App.config')" 
              SourceFiles="$(TransformWebConfigIntermediateLocation)\transformed\App.config" 
              DestinationFiles="$(OutputPath)\WinFormConfigTransform.vshost.exe.config" />
      </Target>


    The only key difference above is that I made the new target to be called after “Build” and in the new target I made a call to “TransformWebConfig” target to ensure the transform happens before we try to copy the transformed app.config file to their final location…


    With the above change now when you build in IDE then the new transformed App.Config will be copied to your output directory…


    With the above 10 steps you should now be able to Transform your App.config just like the way you do Web.Config files in VS 2010


    -Vishal


    PS:  Whenever you make changes to your project file (like above) you make your project susceptible to data loss during upgrade to future versions of VS as next versions of VS will not know all the fancy code you put in the files, but such risks are part of the game to get all the fancy toys working :-)

    Sunday, May 02, 2010

    Xml Document Transforms (XDT) for any XML file in your project

    There have been several requests floating around to be able to use XDTs (the technology behind Web.Debug.Config/Web.Release.Config) with other XML files within the project…  To make that feasible I wrote a XmlDocumentTransform.targets  file which can generically transform any XML file using the standard Web.Config Transformation syntax introduced with VS 2010…

    Learn more about XDT & Web.Config Transformation here…

    Now to get started first download XmlDocumentTransform.targets file from my Skydive…

    Follow the below simple steps to get transformation working for any well formed XML file in your project…

    • Step 1: Save the downloaded XmlDocumentTransform.targets to %ProgramFiles%\MSBuild\Microsoft\VisualStudio\v10.0\Web\XmlDocumentTransform.targets

    image

    NOTE: I would highly encourage you to make a copy of the Microsoft.WebApplication.targets file as backup before you do Step 2 below, as if this file is modified incorrectly then your VS 2010 instances might start showing funny problems which will be virtually impossible to debug and the only option left with you will be to repair/uninstall-install VS 2010… (i.e. proceed at your own risk :-))

    •  Step 2: Put following line of code in Microsoft.WebApplication.targets file just before closing of the Project node i.e. before </Project>...  
      <Import Project="$(MSBuildExtensionsPath)\Microsoft\VisualStudio\v10.0\Web\XmlDocumentTransform.targets" Condition="Exists('$(MSBuildExtensionsPath)\Microsoft\VisualStudio\v10.0\Web\XmlDocumentTransform.targets')" />
      The Microsoft.WebApplication.targets file is located at %ProgramFiles%\MSBuild\Microsoft\VisualStudio\v10.0\WebApplications... 

    image  
    NOTE: Changing the above targets file will allow you to use this functionality with all the Web Application Projects (WAPs), if you just want to change this for the current project then you can put the same Import node in .csproj or .vbproj as well...  If you use per project model then you can also check in this file into source code control and have your team use it seamlessly…

    • Step 3: Open your .csproj/vbproj file and insert the below property in <PropertyGroup> section  <AllXmlsToTransform>Settings.xml;app.config</AllXmlsToTransform>

    image

     NOTE: The Settings.xml or app.config can be replaced with the name of Xml files you want to transform…

    • Step 4: Insert <OnAfterTransformWebConfig>TransformXml;</OnAfterTransformWebConfig> similar to #3 above but do not modify the TransformXml; text here…  This is the actual hook which ties in your project to this generic XDT system...  After making the Step 3 & Step 4 changes your project file should have below content…

    image

    • Step 5: Create Setting.Debug.Xml or similar files and put XDT syntax in them... You need to make sure in the .csproj/.vbproj file of yours you have the DependentUpon property is set like the example below:
          <Content Include="Configuration\Settings.xml" />
          <Content Include="Configuration\Settings.Debug.xml">
            <DependentUpon>Configuration\Settings.xml</DependentUpon>
          </Content>
          <Content Include="Configuration\Settings.Release.xml">
            <DependentUpon>Configuration\Settings.xml</DependentUpon>
          </Content>

    image

    NOTE: The above will allow your solution to look pretty, i.e. just like web.debug.config and web.release.config files show nested under web.config, your *.$(configuration).* files will show nested under your parent file too…

    With the above 5 steps you are all set to use XDT with any of the deployment models covered in the Overview of Web Deployment Post…  In a way above steps harness the power of Web Publishing Pipeline (WPP) extensibility model and you can do several other extensions like above if you are familiar with MsBuild sytax…

    SAMPLE:   The remainder of the post is just showing you the steps to test whether the changes you made worked or not (i.e. the remaining half of the post is just playing with what you already accomplished in the first half)… :-)

    • To test the above target file I created the below MVC 2.0 project structure:

    image

    • Once you put DependentUpon node in your project file you will have to click the  “Show All Files” icon on the solution explorer for VB Projects to see Settings.Debug.Xml
    • My Settings.xml file looked as below:

    image

    • My Settings.Debug.xml file looked as below:

    image

    • To test out I tried simple “file system” publish (Right click on project and say Publish)… The new WAP Publish dialog for me looked as below:

    image

    • After publishing my C:\TestPublish folder looked as below:

    image

    • Note that Settings.Debug.xml was removed from my final publish location as it is not required for my web to function and the content of Settings.xml file were transformed and looked as below:

    image

    TeamBuild/Commandline Approach: You can also use your new transformations from TeamBuild/MsBuild by using the below command (from VS 2010 Command prompt if you are trying locally):

    MsBuild MyXDTTestProject.csproj /t:TransformXml

    The output of the command line transform should look as below:

    image

    As specified above your transformed XML will be stored in obj\$(configuration)\Settings.xml… 

    As such feel free to open the XmlDocumentTransform.targets file which you download, I have tried to put as much comments as I could to make it readable…  If you go through it I am sure you will be able to do many other cool things out of it…

    -Vishal